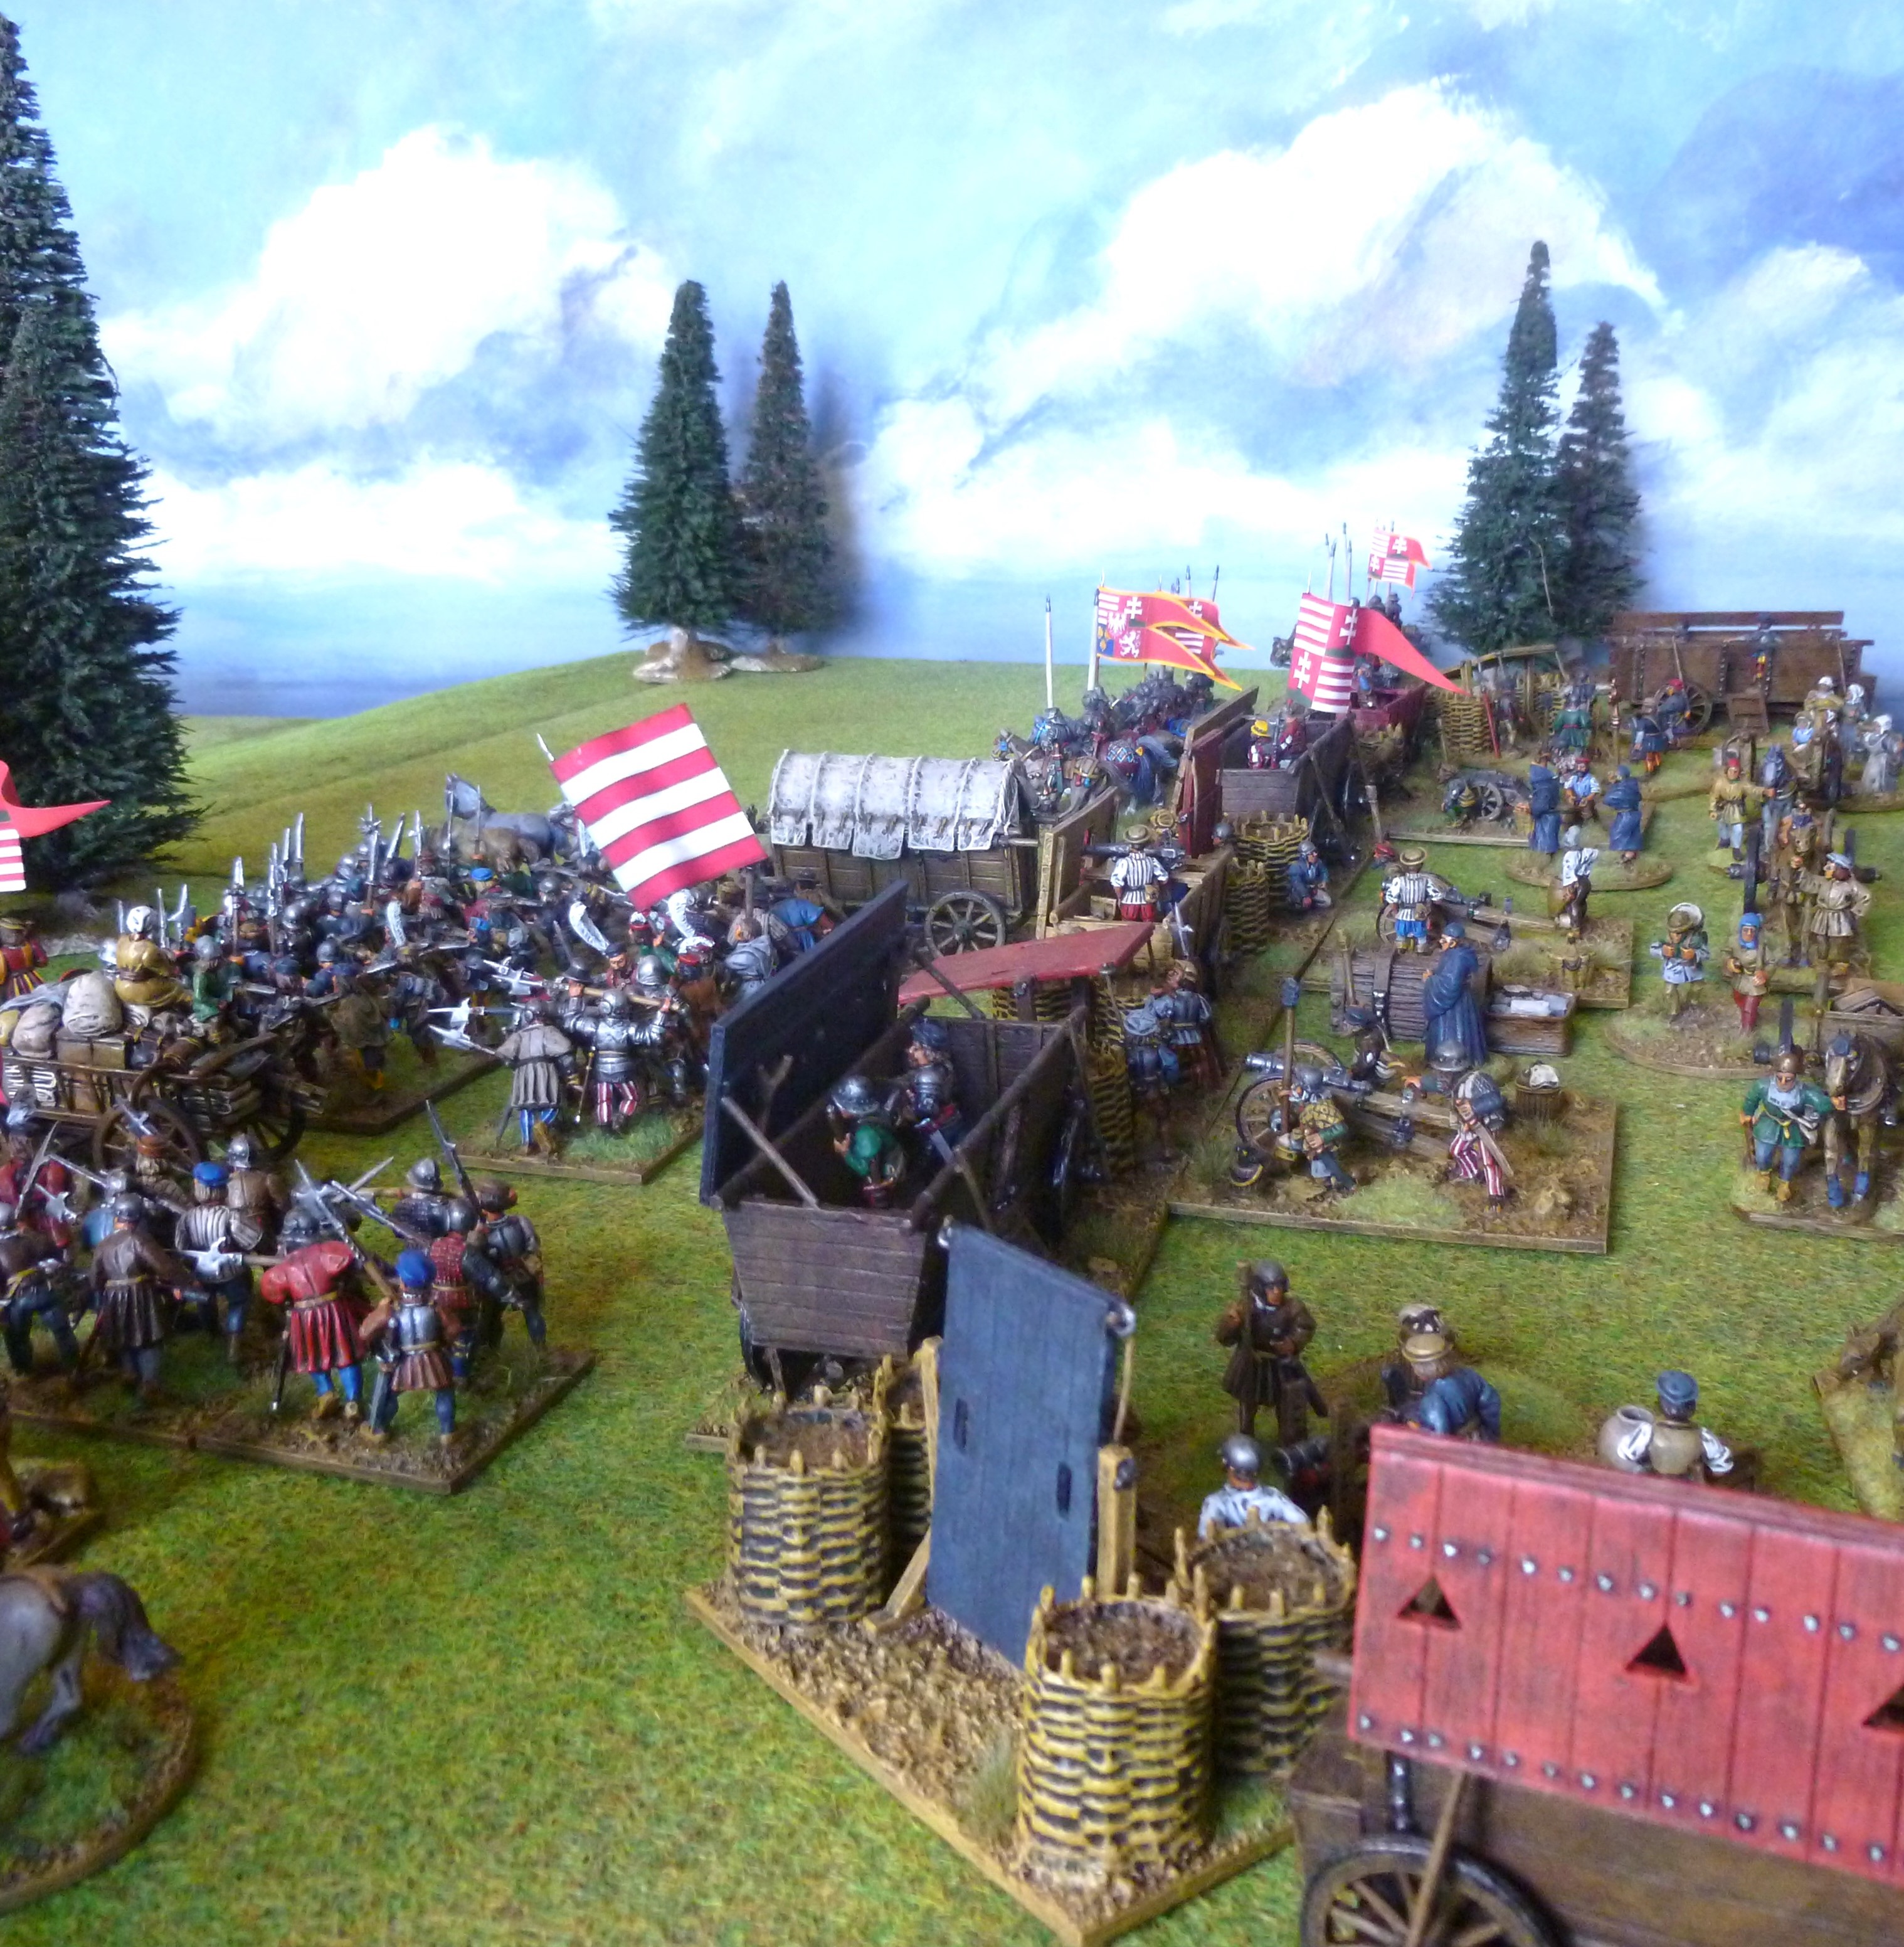

This weekend I travelled to Stuart's to try out his new wargaming set up. Stuart has the perfect terrain for representing the Anglo-Scots border so for our debut games in the new space we decided on two scenarios based around events that took place in the Anglo-Scottish War of 1522-1524.
The skirmish not far from Wark, June 1523
The death of James IV at Flodden did not end the threat that Scotland posed to Henry VIII's northern border. The Scots may have had a minor as King, James V, but the Tudors still had to contend with the "auld alliance" between the French and Scots which meant that any attack on one of the allies could lead to war with both. The Anglo-Scots border witnessed a rapid escalation of violence during the years 1522 to 1524 as Henry VIII launched campaigns in northern France in 1522 and 1523. A war of raid and counter raid took place with notable events in 1523 being the English assaults on Jedburgh, https://camisado1500s.blogspot.com/2021/05/the-english-attack-on-jedburgh.html, and Ferniehurst, https://camisado1500s.blogspot.com/2020/04/dacres-attack-on-ferniehurst-1523.html with a Franco-Scots force striking back at Wark, https://camisado1500s.blogspot.com/2020/08/the-siege-of-wark-1523.html. The fighting would continue into 1524 with a large raid into the West March being led by Lord Maxwell in July, https://camisado1500s.blogspot.com/2021/06/this-was-chaunce-of-warre-lord-maxwells.html, whilst at the same time to the east an English raiding party was caught by the Scots following the burning of Smailholm (see the second scenario https://camisado1500s.blogspot.com/2022/07/the-ill-raid-august-1513.html).
The death of James IV at Flodden did not end the threat that Scotland posed to Henry VIII's northern border. The Scots may have had a minor as King, James V, but the Tudors still had to contend with the "auld alliance" between the French and Scots which meant that any attack on one of the allies could lead to war with both. The Anglo-Scots border witnessed a rapid escalation of violence during the years 1522 to 1524 as Henry VIII launched campaigns in northern France in 1522 and 1523. A war of raid and counter raid took place with notable events in 1523 being the English assaults on Jedburgh, https://camisado1500s.blogspot.com/2021/05/the-english-attack-on-jedburgh.html, and Ferniehurst, https://camisado1500s.blogspot.com/2020/04/dacres-attack-on-ferniehurst-1523.html with a Franco-Scots force striking back at Wark, https://camisado1500s.blogspot.com/2020/08/the-siege-of-wark-1523.html. The fighting would continue into 1524 with a large raid into the West March being led by Lord Maxwell in July, https://camisado1500s.blogspot.com/2021/06/this-was-chaunce-of-warre-lord-maxwells.html, whilst at the same time to the east an English raiding party was caught by the Scots following the burning of Smailholm (see the second scenario https://camisado1500s.blogspot.com/2022/07/the-ill-raid-august-1513.html).
Whilst these were engagements involving thousands of English and Scots troops there were many smaller clashes in these years as English garrisons raided into Scotland or as Scots struck back across the border and attacked English settlements. An example of this is an ambush that took place prior to the larger scale fighting which followed in the autumn of 1523. Writing on 24 June 1523 Thomas Magnus, a churchman and diplomat who acted as paymaster and treasurer for the English border garrisons in that year, wrote to Thomas Dacre, Warden-general of the marches, informing him of an ambush that had taken place between the garrisons of Alnwick and Wark and a force of Scots raiders.
Lord Leonard Grey, a professional soldier serving in the north who would take part in the French invasion that autumn and later lead an English army to victory at Belahoe in Ireland (see https://camisado1500s.blogspot.com/2022/08/belahoe-1539.html) was serving with men from his elder brother's retinue, his brother being Thomas Grey, 2nd Marquess of Dorset. Leonard Grey informed Magnus that Ceton, the Captain of Wark had asked him for 100 men of his brother's retinue as following a raid by Dacre to Ednam the Scots were daily assembling around Wark Castle with 200 to 300 men. Grey had left Alnwick with 120 men and met with a younger son of Sir Richard Tempest and a gentleman named Hoothom with a force of 180 men. This force of 300 men arrived at Wark and the following morning, hearing that the Scots were approaching, Captain Ceton left Grey in charge of the castle and rode out to ambush the Scots.
Ceton sent 50 spears and 20 bows to lure the Scots in leaving the rest of the men in ambush. In the ensuing clash 25 Scots were slain and 61 taken prisoner. The English force also took many of the best horses the Scots had in the region, a standard and a "gyttern", or cavalry guidon. According to Magnus's letter one Englishman was slain and another captured. Several of the Trotter and Davidson reiver family members were captured and Davy Home was forced to flee with a spear broken either in his coat or his body.
 |
| A force of Homes, Trotters and Davidsons assembles on the border close to Wark castle... |
 |
| ...ahead of them they see an English force of around "50 spears and 20 bows". |
Scenario
To represent the ambush described above the Scots force started on the table facing a small force of mounted English troops, the spears and bows described in Thomas Magnus's letter. The two pictures below show the initial deployment.
As always we used our adapted Lion Rampant rules for both of the games.
As always we used our adapted Lion Rampant rules for both of the games.
The Ambush
To represent the rest of the English lying in wait “battered” markers were used to represent each hidden English unit, with their captain writing down in secret which unit each marker was for. 3 "Dummy" markers were also allowed. A unit was revealed either by a Scots unit attacking or shooting it once it was within 8” of the marker or by a Scots unit simply moving within 3” of it. The English retinue leader could not apply his morale bonus until he had been revealed and all counters could "move" activate on a 6+ and move 6” until they were revealed. If units wanted to “reveal” themselves earlier, for example if the retinue leader wanted to give his leadership benefit, they could do so by declaring this when they activated. Once “revealed” units did not disappear again.
Units did not have to test for wild charge whilst hidden.
Prisoners
To represent the personal nature of these clashes, and the fact that some of the borderers on each side would have known each other, victory in this game was based on the taking of prisoners. A figure that was totaled up during the game and no matter which units had fled or been lost at the end it was the number of prisoners taken that counted. Routed units were assumed to have safely escaped and made it back across the border or to their garrison.
Each time a unit was in combat with another the players rolled a dice for each casualty they caused. On a 4+ that casualty was considered to have been captured (and removed from the field by non combatants!) and added to that players prisoner score.
The same rule also applied to retinue leaders if killed in a duel or combat. A captured retinue leader was worth 3 prisoner points whilst normal casualties counted as 1 prisoner point.
Casualties caused by skirmishing or shooting could not be taken prisoner.
At the end of the game the player with the most "prisoner points" was considered the winner.
Munitions
Every time any ranged unit shot or skirmished (including evasion moves) if rolling 12 dice and 5 1s or 2s were rolled then the unit was out of ammunition and could not shoot/skirmish anymore. If 6 dice were rolled (as the unit was at half strength or less) and 3 1s or 2s were rolled then the unit ran out of ammunition. An ammunition marker was then placed by the unit.
 |
| A view of the table from above. On the left is the Scots force whilst the English spears and bows from the garrisons of Wark and Alnwick are in the centre. The rest of the English garrison, led by Captain Ceton is lying in ambush. |
 |
| A view from the Scots lines. It looks as if they are only facing a small party of English. |
The Armies
Stuart chose to play as the English for this game so I took on the role of the Scots raiders.
Stuart chose to play as the English for this game so I took on the role of the Scots raiders.
Captain Ceton and the garrisons of Wark and Alnwick
Starting on the table:
1 Unit of Demilancers
1 Unit of Border Horse
2 Units of Mounted Archers
Lying in Ambush (see rules above):
1 Unit of Demilancers (Retinue Leader - Captain Ceton)
1 Unit of Garrison Billmen
2 Units of Garrison Archers
2 Units of Border Horse
1 Unit of Borderers
Davy Home and the Homes, Trotters and Davidsons
1 Unit of Demilancers (Retinue Leader - Davy Home)
3 Units of Border Horse
1 Unit of Scots Pike
3 Units of Borderers
2 Units of Retinue foot
1 Unit of Scots Arquebusiers
The objective of taking prisoners totally changed the nature of this game and resulted in a fast and furious clash which is briefly described below. The pictures also tell the bitter tale of border rivalry that played out!
The objective of taking prisoners totally changed the nature of this game and resulted in a fast and furious clash which is briefly described below. The pictures also tell the bitter tale of border rivalry that played out!
 |
| Much to the surprise of the Scots the smaller English force attacks immediately. |
 |
| The English demilancers drive the Scots troops back, capturing some of them in the process. |
 |
| English border horse join the attack on the Scots party. |
Captain Ceton laid the trap perfectly. As the Scots appeared on the horizon they rushed towards the small group of English horsemen thinking they could quickly overpower them, hopefully taking many of them prisoner. They were surprised and alarmed when instead of fleeing the English demilancers and border horsemen charged straight into them. A confused melee ensued, with some of the Scots being captured and more slain.
As the fighting continued previously hidden units of English appeared and joined the fray. This escalation of the fighting drew more and more of the Scots into the action with both sides taking heavy casualties. These raiders from the Home, Trotter and Davidson family had clashed with members of the garrison of Wark before and there were old scores to be settled.
 |
| Davy Home and his men have been surprised by the ferocity of the English attack but, still thinking they have they numerical advantage, they are lured down the hill to attack the English archers. |
 |
| As the Scots advance Captain Ceton and a force of demilancers and border horse break from cover and charge into the Scots... |
 |
| ...a fierce melee develops in which both sides take casualties and capture enemies from across the border. |
 |
| Old rivalries play out as bands of border horse in the Scots and English armies clash with one another. |
 |
| The engagement develops into a chaotic clash of arms. |
 |
| Captain Ceton is slain in the fighting but the Scots curse as the Captain of the Wark garrison would have fetched a good ransom. |
 |
| The English borderers attempt to capture Davy Home but his well armoured retainers fight them off. |
Both the Scots and English were taking casualties in the fighting. Captain Ceton and his armoured demilancers charged from their cover and rode headlong into the chaotic melee. Ceton was unable to get to the leader of the Scots force, Davy Home, but he cut down many of the Home clan in the fighting. The Scots fought back and Captain Ceton, sensing the tide was turning, sounded a withdrawal.
The English began to disengage, some of them making off with prisoners who they knew they would be able to ransom back to their reiver families across the border. As Captain Ceton attempted to escape he was chased down and slain as were some of the other English borderers who attempted to flee. The Scots were left on the field but it had been no victory for them. Both sides had sustained heavy losses and both had captured 20 prisoners. The clash had ended in the draw and it had been a bloody morning on the border.
 |
| Having given the Scots a bloody nose and taken a score of them prisoner the English force disengages and heads back to Wark. A detachment of English borderers is ridden down by the vengeful Scots but the easy victory they had hoped for has been stolen from them and the morning has ended in a costly draw. |

"the Scottes drew together toward Branxston"
Another small scale clash took place on 21 May 1524. Knowing that a market was held in Berwick every Trinity Sunday 500 hundred Scots crossed the border in order to rob the merchants and traders on their way to the market. Whilst the Scots were initially successful, taking goods and wealthy prisoners, their presence became known to the local English garrisons and a fight developed in which both sides took casualties as the Scots attempted to escape with their loot. According to Hall's chronicle the Scots raiders were successfully fending off the attack until the arrival of the Lord of Fulbery with 50 light horse. This prevented many of the Scots from escaping and two hundred were captured in the ensuing rout.
Hall's account of the event is given below:
"The. xxi. day of May beyng Trinite Sondaie. v. C. Scottes in the morning by several fordes, entered into Englande, and laye couertly by the high waie, to distresse merchauntes and merket men that should passe to Benvike (Berwick), that day to the faire: for euery Trinite Sondaie, ther is kept a great faire, whiche the Scottes knewe well, and as they laye thus lurking, thei robbed many merchauntes, and toke rich prisoners, but at the last they were perceiued, then the Alarms rose, and people began to gather, the Scottes drew together toward Branxston (Branxton), & thenglishmen them assailed, which so manfully them defended, that if the yong lorde of Fulbery, had not come with one. C. light horsmen, the Scottes had gone away with their botie, but then began a sore fight, many were hurt on both sides, and some slain, and at the last the Scottes fled, and in the chace there were two hundred Scottes taken prisoners, and the residue fled and saued themselfes."
 |
| The "v. C. Scottes" head back from the high way to Berwick, laden with plunder and prisoners. They pass a convent as they return to Scotland. |
 |
| The Scots find their path blocked by an English force hastily raised from the local border garrisons. |
Scenario
In this game the Scots were attempting to retreat with their loot whilst a force of English attempted to block them. The Lord of Fulbery and the cavalry would arrive behind the escaping Scots as the crossed the river.
The Scots started at one end of the table and had to get as many units off the other side with their loot.
As the first game had been a closely fought draw Stuart and I decided that he would remain in command of the English and I would play as the Scots again. We continued to the use the Munitions rules from the first scenario as we felt they really changed the dynamic and made the first game more challenging.
As the first game had been a closely fought draw Stuart and I decided that he would remain in command of the English and I would play as the Scots again. We continued to the use the Munitions rules from the first scenario as we felt they really changed the dynamic and made the first game more challenging.
"by seueral fordes, entered into Englande"
Once the first Scots unit was across the river the English player could roll 2 dice at the start of their turn to see if the the Lord of Fulbery arrived with the cavalry. On the first time rolling after a Scots unit had crossed the river a 9+ would bring on the cavalry. The following turn it would be an 8+ and so on. Lord Fulbery's cavalry could only enter the table via move activations. They could not enter via skirmish or attacking activations.
"thei robbed many merchauntes, and toke rich prisoners"
As loot the Scots had 1 rich merchant as a prisoner for ransom, 2 wagons and 3 livestock counters. At the start of the game these were allotted to 6 Scots units (mounted or on foot). These units could move a maximum of 6" per turn and would loose the prisoner, livestock or wagons if they were defeated in combat or battered. They units could not attack or skirmish but could shoot whilst they had control of the prisoner, livestock or wagons. Units could pick up the "lost" prisoner, livestock or wagons by moving into base to base contact with them. They were then considered to have picked up the loot and could move with it. The prisoner, livestock or wagons could be picked up by both the Scots and English units.
If lost the wagons would not move but the prisoner would move D6+2 inches in a random direction at the start of every turn and the livestock would move 2D6 inches in a random direction at the start of every turn.
Victory points
Victory in this game was based on who had managed to secure the most loot.
If a Scots unit left the table with the prisoner, livestock or wagons the Scots would get the points for that particular loot whilst if the English had the prisoner, livestock or wagons in their possession (ie held by units) at the end of the game they would get the points for what they held.
The points for the loot were:
3 for the Rich Merchant Prisoner
2 for the Wagons
1 for each of the Livestock ( the 3 livestock "counters" were represented by cows, sheep and a final "counter" of pigs and goats)
 |
| A view of the table from above. The Scots and their plunder are on the right whilst the English are on the left. The Scots must get as much plunder as possible across the river to the table edge behind the English. Once a unit of Scots crosses the river then the Lord of Fulbery will enter the table from behind them (on the right) with a force of English cavalry. |
 |
| The English party hastily assembled to face the raiders, comprising of borderers and men from the local garrisons. |
The Armies
The Scots
The Scots
1 Unit of Demilancers (Retinue Leader)
3 Units of Border Horse
2 Units of Pike
1 Unit of Retinue Foot
1 Unit of Scots Arquebusiers
3 Units of Borderers
The English
The force attempting to block the Scots:
The force attempting to block the Scots:
2 Units of Shire Billmen
2 Units of Shire Archers
1 Unit of Border Horse
1 Unit of Mounted Archers
1 Unit of Borderers
Lord of Fulbery's Cavalry who arrive in pursuit of the Scots:
1 Unit of Demilancers (Retinue Leader - Lord of Fulbery)
2 Units of Border Horse
1 Unit of Mounted Archers
This game turned into an epic fight with action taking place all over the field. I have tried to summarise some of this below which, along with the help of the photos, should give some idea of what happened!
This game turned into an epic fight with action taking place all over the field. I have tried to summarise some of this below which, along with the help of the photos, should give some idea of what happened!
 |
| Undaunted by the English blocking their path the Scots head for the river in an effort to make it back to Scotland with their loot. |
 |
| They have captured a rich prisoner in the form of a wealthy merchant. |
 |
| The English attempt to slow the Scots with border horsemen and mounted archers. |
 |
| The English send a rain of arrows into the advancing Scots... |
 |
| ...but the Scots march to the border continues. |
 |
| As the Scots drive the stolen livestock forward they see that the English have been reinforced by a small artillery piece. |
Having taken rich pickings on the high way to Berwick the Scots began their journey back across the border in high spirits. They had planned to return to Scotland via the "several fordes" they had used to enter England. They were annoyed to see some of the local English garrison troops and borderers had formed a party to try and stop them. The Scots raiders pressed on regardless and kept in good order despite attacks by the English cavalry and volleys of arrows from the English archers. Even the reinforcement of the English with a small artillery piece from a local border fortress did not daunt the retreating raiders.
As the Scots crossed the shallow waters of the river the fighting got heavier. English billmen and archers joined the fray but the Scots held their formation and over ran each English unit as it attempted to face them. It was looking as though they would get back with all of their newly acquired riches, be these the goods loaded onto wagons, the livestock they had rustled, or the rich merchant they had taken prisoner who could be ransomed for a small fortune.
 |
| Scots border horse and English mounted archers clash in the shallow waters of the river. |
 |
| A view of the field as the Scots near the river |
 |
| The Scots drive forward into the English arrow storm. |
 |
| A group of borderers are first to cross the river with their livestock. |
 |
| It looks as though many of the Scots are going to escape. |
 |
| The English attempt to stop the Scots from crossing. |
 |
| English billmen clash with the escaping borderers. They inflict casualties before being driven off. The first group of raiders make it back to Scotland with their plunder. |
As the Scots neared the border they heard the blare of trumpets behind them. It became apparent that the "yong lorde of Fulbery" had arrived in pursuit with "one. C. light horsmen" and panic began to set into their ranks. The Scots captain turned back and attacked the horsemen as they arrived, attempting to buy time for his men in a rearguard action. The Lord of Fulbery charged into the leader of the Scots raiding party and quickly slew him, an action which had a terrible effect on the morale of the Scots.
Terrified that they were going to be ridden down by the English many of the retreating Scots panicked and fled. Some of the herds of rustled livestock were abandoned as was one of the loot laden wagons. The biggest blow for the Scots came when the wealthy merchant managed to escape in the rout. His ransom would have been worth a fortune but the wily merchant saw his opportunity and took it, disguising himself in the cloak and bonnet of a fallen Scotsman.
The organised Scots withdrawal across the border turned into a series of running fights all across the field as different groups bitterly fought over the stolen goods and livestock. The English artillery piece was put to good use, sending a lethal hail of shot into the Scots as they attempted to pass it. Two bands of Scotsmen managed to escape with herds of livestock. The most vicious fighting was over the wagons which were both captured and recaptured multiple times by the Scots and English. Eventually the Scots made off with one of the wagons leaving the other to the English. It was a narrow and very hard fought victory for the surviving Scots who crossed the border cursing their luck for letting the merchant escape.
 |
| Behind the Scots "the yong lorde of Fulbery" has arrived. The Scots captain fights a rearguard action... |
 |
| ...but is slain by the Lord of Fulbery outside the convent. The death of the Scots captain has a terrible effect on the raiding party's morale. |
 |
| The Scots raiders have been reinforced by more border horsemen but the cattle they have stolen are won back by some English border horse. |
 |
| Alarm spreads through the Scots ranks as they learn their captain has been slain and that the Lord of Fulbery is hot on their tail with his cavalry. In the panic the rich merchant manages to escape and slip away disguised as a Scottish soldier. The Scots raiders have lost their most valuable prisoner! |
 |
| Things get worse for the retreating Scots as the English put up a hard fight, putting many of them to flight in disorder. |
 |
| A local English garrison has deployed an artillery piece which causes havoc as the Scots attempt to escape with their loot loaded into wagons. |
 |
| One wagon in particular is much fought over and despite their best efforts the Scots are unable to escape with it. |
 |
| After much hard fighting one of the wagons does make it off the field. It has been a narrow victory for the Scots, who are still confused and cursing that the wealthy merchant has somehow managed to escape! |
This was a great debut for Stuart's wargaming set up. Two really close and very fun games that also looked spectacular on his terrain. The prisoner rule in the first game totally changed the way we normally played and turned what would have normally been a game with lots of skirmishing and archery into a blood bath. We both threw unit after unit into hand to hand fighting in an attempt to capture more prisoners. Stuart captured lots of prisoners in his initial charges which then meant I was constantly chasing his "prisoner score" only matching it right at the end of the game when we both had 20 a piece. It was a fun special a rule which I think we will revisit.
The second game was also a very close and hard fought affair, especially once the Scots captain had been killed and about half of my units suddenly failed their courage checks and began to flee. The unit holding the merchant routed and the random movement of the escaped prisoner meant he fled the field, followed by much cursing from me! At one point there was something happening in every corner of the table, which is quite rare in these games.
As peace returns to the borders we are already planning our next set of games and there will hopefully be more to come in the summer.